背景#
很久之前就想有一个网络共享文件夹,即一个既能在本地当做普通文件夹使用,也能通过互联网访问到的文件夹。
大致对比了一下这些可能能够用于实现该功能的服务:
| 服务 | 优点 | 缺点 |
|---|---|---|
| 以百度云为代表的国内网盘 | 存储空间大 | 对linux支持差,访问速度慢 |
google drive/mega等国外网盘 | linux客户端支持 | 存储空间较小,国内速度慢甚至无法连通 |
各类oss服务(例:阿里云oss) | 官方挂载支持,速度无限制 | 存储费用、流量费用、请求费用累计,代价昂贵 |
| 服务器空闲存储空间 | 可通过sftp访问 | 受服务器带宽限制,使用效果并不理想 |
可以看到各个服务各有优缺点。但最近,我发现了另一款产品:世纪互联版onedrive。它是微软委托国内的世纪互联运营的,对比onedrive国际版,一方面其数据中心位于北京 / 上海,极大地优化了国内用户的访问速度;另一方面,淘宝有大量低价号贩售,五六十块即可买到 “永久” 的5T存储空间(此处存疑)。上网查询,发现这个世纪互联版onedrive在本地可以通过魔改rclone实现挂载,在云端可以使用魔改oneindex、zfile等开源项目实现浏览器访问(不走服务器流量,无限速),完美满足我的需求,于是入了一个,准备开搞。
需要#
- 一台自己的电脑
- 一台服务器
- 开放 api的
世纪互联版onedrive账号(一定要是开放 api的!)
云端#
先说简单的云端访问,我使用的是zfile(因为它配置简单,原生支持世纪互联onedrive)。
接下来操作以
ubuntu为例,centos请移步官方文档。
ssh到服务器,首先安装依赖:
sudo apt install -y openjdk-8-jre-headless unzip
下载项目,解压并给予可执行权限:
cd ~
wget https://c.jun6.net/ZFILE/zfile-release.war
mkdir zfile && unzip zfile-release.war -d zfile && rm -rf zfile-release.war
chmod +x zfile/bin/*.sh
启动项目:
~/zfile/bin/start.sh
接下来访问http://你的公网ip:8080/#/install进行配置。其中的访问令牌和刷新令牌需要访问这个网址登录账号后获取,填写成功之后点击确认即配置完成,可以在网页访问到你的onedrive云盘了!
本地#
接下来配置稍微复杂点儿的本地挂载。
以下内容转载自znov 的博客,因为他是在服务器挂载,而我是在本机,所以做了少量修改。(windows 只需要进行前三步,未经过实测)。
-
世纪互联 OneDrive获取CLIENT_ID及CLIENT_SECRET- 打开该网页登录账号。
- 左侧找到
Azure Active Directory点击
左侧找到应用注册点击
上方找到新注册点击
名称:onedrive
受支持的账户类型:任何组织目录(第二个)
重定向 URL:http://localhost:53682
点击注册
找到应用程序(客户端) ID复制保存
左侧找到证书和密码点击
下方 客户端密码 -新建客户端密码
说明:onedrive
截止期限:默认一年内
点击 添加,值复制保存
左侧找到API 权限点击
添加权限:Microsoft Graph-委托的权限:全部勾选(这里经我测试只勾选File栏即可)
-
安装配置
rclone -
此处下载
rclone世纪互联版该文件来源于全球主机论坛爱纯粹大佬,因为原博客的下载链接速度很慢,所以另存了一份。希望大家下载的同时可以顺便去原博客评论支持一下!
-
linux在当前目录打开terminal,执行sudo mv ./rclone的文件名 /usr/bin/rclone sudo chmod +x /usr/bin/rclonewindows请自行查阅如何将文件添加到环境变量中。注:此步骤非必须,如未执行则将以下语句的
rclone改为rclone的路径形式。 -
输入
rclone config进行如下配置e) Edit existing remote n) New remote d) Delete remote r) Rename remote c) Copy remote s) Set configuration password q) Quit config e/n/d/r/c/s/q> n name>onedrive Type of storage to configure. Enter a string value. Press Enter for the default (""). Choose a number from below, or type in your own value 1 / 1Fichier \ "fichier" 2 / Alias for an existing remote \ "alias" 3 / Amazon Drive \ "amazon cloud drive" 4 / Amazon S3 Compliant Storage Provider (AWS, Alibaba, Ceph, Digital Ocean, Dreamhost, IBM COS, Minio, etc) \ "s3" 5 / Backblaze B2 \ "b2" 6 / Box \ "box" 7 / Cache a remote \ "cache" 8 / Citrix Sharefile \ "sharefile" 9 / Dropbox \ "dropbox" 10 / Encrypt/Decrypt a remote \ "crypt" 11 / FTP Connection \ "ftp" 12 / Google Cloud Storage (this is not Google Drive) \ "google cloud storage" 13 / Google Drive \ "drive" 14 / Google Photos \ "google photos" 15 / Hubic \ "hubic" 16 / JottaCloud \ "jottacloud" 17 / Koofr \ "koofr" 18 / Local Disk \ "local" 19 / Mail.ru Cloud \ "mailru" 20 / Mega \ "mega" 21 / Microsoft Azure Blob Storage \ "azureblob" 22 / Microsoft OneDrive \ "onedrive" 23 / OpenDrive \ "opendrive" 24 / Openstack Swift (Rackspace Cloud Files, Memset Memstore, OVH) \ "swift" 25 / Pcloud \ "pcloud" 26 / Put.io \ "putio" 27 / QingCloud Object Storage \ "qingstor" 28 / SSH/SFTP Connection \ "sftp" 29 / Transparently chunk/split large files \ "chunker" 30 / Union merges the contents of several remotes \ "union" 31 / Webdav \ "webdav" 32 / Yandex Disk \ "yandex" 33 / http Connection \ "http" 34 / premiumize.me \ "premiumizeme" Storage>22 ** See help for onedrive backend at: https://rclone.org/onedrive/ ** Microsoft App Client Id Leave blank normally. Enter a string value. Press Enter for the default (""). client_id>输入上面“应用程序(客户端)id” Microsoft App Client Secret Leave blank normally. Enter a string value. Press Enter for the default (""). client_secret>输入上面申请到的“值” OneDrive operated by 21Vianet (世纪互联). Enter a boolean value (true or false). Press Enter for the default ("false"). is_21vianet_version>true Edit advanced config? (y/n) y) Yes n) No y/n>n Use auto config? * Say Y if not sure * Say N if you are working on a remote or headless machine y) Yes n) No y/n>y 之后会自动打开一个网页,在这个网页里进行登录,然后继续.. Choose a number from below, or type in an existing value 1 / OneDrive Personal or Business \ "onedrive" 2 / Root Sharepoint site \ "sharepoint" 3 / Type in driveID \ "driveid" 4 / Type in SiteID \ "siteid" 5 / Search a Sharepoint site \ "search" Your choice> 1 Found 1 drives, please select the one you want to use: 0: OneDrive (business) id=****** Chose drive to use:>0 Found drive 'root' of type 'business', URL: https://alphaone-my.sharepoint.cn/personal/*** Is that okay? y) Yes n) No y/n>y y q -
进行挂载
linux需要安装fuse,各大发行版不一样就不详述了,我的manjaro自带。命令如下:(其中的 / 表示需要挂载到本地的
onedrive路径,/mnt/表示本机的挂载路径,可对应修改)挂载命令:rclone mount onedrive:/ /mnt/ --copy-links --no-gzip-encoding --no-check-certificate --allow-other --allow-non-empty --umask 000 后台挂载命令:nohup rclone mount onedrive:/ /mnt --copy-links --no-gzip-encoding --no-check-certificate --allow-other --allow-non-empty --umask 000 >/dev/null 2>&1 & 卸载命令:fusermount -qzu LocalFolder onedrive -
使用挂载脚本
这个挂载脚本能够实现基本的挂载、卸载和重新挂载功能,之后使用的话就没有必要输入那么长的命令了。脚本如下:
#!/bin/bash
# ------------------------------------------
PATH=/bin:/sbin:/usr/bin:/usr/sbin:/usr/local/bin:/usr/local/sbin:~/bin
export PATH

### BEGIN INIT INFO
# Provides:          rclone
# Required-Start:    $all
# Required-Stop:     $all
# Default-Start:     2 3 4 5
# Default-Stop:      0 1 6
# Short-Description: Start rclone at boot time
# Description:       Enable rclone by daemon.
### END INIT INFO
# ------------------------------------------
# 以上两条横线之间的内容不自启的话可以去掉(个人觉得自启的话去掉应该也没啥影响)

NAME_BIN="rclone"
NAME="onedrive"
REMOTE='/' #需要挂载到本地的onedrive路径,可修改
LOCAL='/mnt/' #挂载到本地的哪个文件夹,可修改

Green_font_prefix="\033[32m" && Red_font_prefix="\033[31m" && Green_background_prefix="\033[42;37m" && Red_background_prefix="\033[41;37m" && Font_color_suffix="\033[0m"
Info="${Green_font_prefix}[信息]${Font_color_suffix}"
Error="${Red_font_prefix}[错误]${Font_color_suffix}"
RETVAL=0

check_running(){
    PID="$(ps -C $NAME_BIN -o pid= |head -n1 |grep -o '[0-9]\{1,\}')"
    if [[ ! -z ${PID} ]]; then
        return 0
    else
        return 1
    fi
}
do_start(){
    check_running
    if [[ $? -eq 0 ]]; then
        echo -e "${Info} $NAME_BIN (PID ${PID}) 正在运行..." && exit 0
    else
        fusermount -zuq $LOCAL >/dev/null 2>&1
        mkdir -p $LOCAL
        /usr/bin/rclone mount $NAME:$REMOTE $LOCAL --copy-links --no-gzip-encoding --no-check-certificate --allow-other --allow-non-empty --umask 000 >/dev/null 2>&1 &
        check_running
        if [[ $? -eq 0 ]]; then
            echo -e "${Info} $NAME_BIN 启动成功 !"
        else
            echo -e "${Error} $NAME_BIN 启动失败 !"
        fi
    fi
}
do_stop(){
    check_running
    if [[ $? -eq 0 ]]; then
        kill -9 ${PID}
        RETVAL=$?
        if [[ $RETVAL -eq 0 ]]; then
            echo -e "${Info} $NAME_BIN 停止成功 !"
        else
            echo -e "${Error} $NAME_BIN 停止失败 !"
        fi
    else
        echo -e "${Info} $NAME_BIN 未运行"
        RETVAL=1
    fi
    fusermount -zuq $LOCAL >/dev/null 2>&1
    fusermount -zuq $LOCAL1 >/dev/null 2>&1
}
do_status(){
    check_running
    if [[ $? -eq 0 ]]; then
        echo -e "${Info} $NAME_BIN (PID $(echo ${PID})) 正在运行..."
    else
        echo -e "${Info} $NAME_BIN 未运行 !"
        RETVAL=1
    fi
}
do_restart(){
    do_stop
    do_start
}
case "$1" in
    start|stop|restart|status)
    do_$1
    ;;
    *)
    echo "使用方法: $0 { start | stop | restart | status }"
    RETVAL=1
    ;;
esac
exit $RETVAL
假设该脚本被保存为
rcloned,首先给予可执行权限:chmod +x rcloned的路径之后可以选择将其移动到环境变量中,使用的时候手动执行
rcloned start:sudo mv rcloned的路径 /usr/bin/rcloned # 每次使用时 rcloned start也可以选择像原文那样设置为开机自动运行(可能不支持所有发行版):
sudo mv rcloned的路径 /etc/init.d/rcloned
sudo /etc/init.d/rcloned start
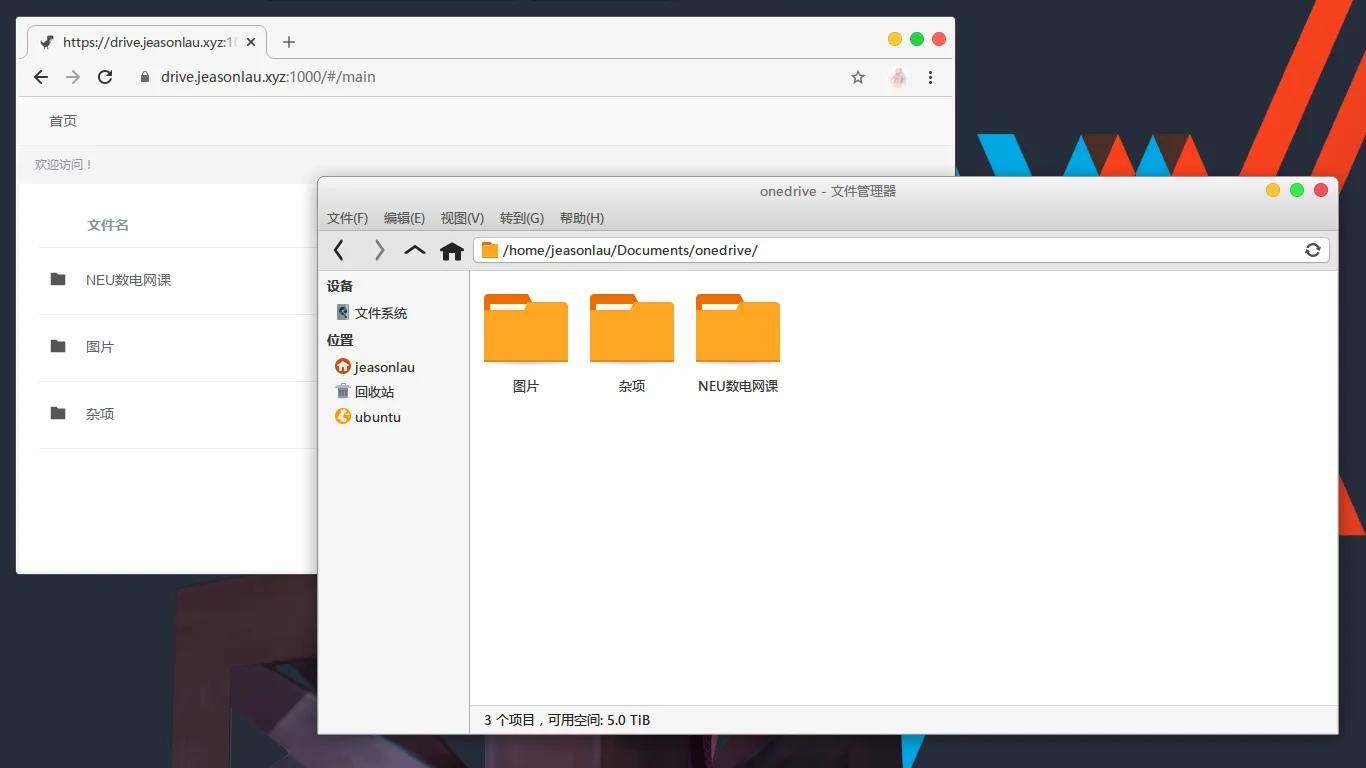
截图#
碎碎念#
本来打算稍微写写水一篇文章的,没想到一不小心写了这么多...
中间某些步骤写的过分详细了,希望大家阅读的时候不要嫌我啰嗦 orz
参考#
-
Zephyr 杂货铺(我购买账号的地方)