Background#
I have wanted a network shared folder for a long time, which can be used as a regular folder locally and accessed via the internet.
I roughly compared the services that could potentially achieve this functionality:
| Service | Advantages | Disadvantages |
|---|---|---|
| Domestic cloud storage represented by Baidu Cloud | Large storage space | Poor support for linux, slow access speed |
Foreign cloud storage like google drive/mega | linux client support | Smaller storage space, slow or even unreachable in China |
Various oss services (e.g., Alibaba Cloud oss) | Official mount support, unlimited speed | Accumulated storage, traffic, and request costs, expensive |
| Idle storage space on servers | Accessible via sftp | Limited by server bandwidth, not ideal usage |
As we can see, each service has its pros and cons. Recently, I discovered another product: Century Internet Version of OneDrive. It is operated by Microsoft through Century Internet in China. Compared to the international version of OneDrive, its data centers are located in Beijing/Shanghai, greatly optimizing access speed for domestic users. Additionally, there are many low-priced accounts available on Taobao, where you can buy "permanent" 5T storage space for fifty or sixty yuan (this is questionable). After searching online, I found that this Century Internet Version of OneDrive can be mounted locally using modified rclone, and accessed in the cloud using open-source projects like modified oneindex, zfile, etc. (without using server traffic, unlimited speed), perfectly meeting my needs, so I got one and prepared to get started.
Requirements#
- A personal computer
- A server
- An open API
Century Internet Version of OneDriveaccount (must be open API!)
Cloud Side#
First, let's talk about the simple cloud access. I am using zfile (because it is easy to configure and natively supports Century Internet OneDrive).
The following operations are based on
ubuntu, forcentosplease refer to the official documentation.
SSH into the server and first install the dependencies:
sudo apt install -y openjdk-8-jre-headless unzip
Download the project, unzip it, and give it executable permissions:
cd ~
wget https://c.jun6.net/ZFILE/zfile-release.war
mkdir zfile && unzip zfile-release.war -d zfile && rm -rf zfile-release.war
chmod +x zfile/bin/*.sh
Start the project:
~/zfile/bin/start.sh
Next, access http://your_public_ip:8080/#/install for configuration. The access token and refresh token need to be obtained by logging in at this URL. After filling in successfully, click confirm to complete the configuration, and you can access your OneDrive cloud drive on the web!
Local#
Next, let's configure the slightly more complex local mount.
The following content is reproduced from znov's blog, as he mounted it on the server, while I am doing it on my local machine, so I made a few minor modifications. (Windows only needs to perform the first three steps, not tested).
-
Obtain
CLIENT_IDandCLIENT_SECRETforCentury Internet OneDrive- Open this webpage and log in.
- Find
Azure Active Directoryon the left and click it.
FindApp registrationson the left and click it.
FindNew registrationat the top and click it.
Name:onedrive
Supported account types:Any organizational directory(the second option)
Redirect URL:http://localhost:53682
Click register.
FindApplication (client) IDand copy it for later use.
FindCertificates & secretson the left and click it.
Below, Client secrets -New client secret
Description:onedrive
Expiration: defaultin one year
Click Add, copy theValuefor later use.
FindAPI permissionson the left and click it.
Add permissions:Microsoft Graph-Delegated permissions: check all (through my testing, checking only theFilesection is sufficient).
-
Install and configure
rclone-
Download here the
rcloneCentury Internet version.This file comes from the global hosting forum, thanks to the great contributor. The original blog's download link is very slow, so I saved a copy. I hope everyone can also take a moment to comment and support the original blog!
-
Open
terminalin the current directory onlinuxand executesudo mv ./rclone_filename /usr/bin/rclone sudo chmod +x /usr/bin/rcloneFor
windows, please refer to how to add files to the environment variable.Note: This step is not mandatory. If not executed, change
rclonein the following commands to the path form ofrclone. -
Enter
rclone configto configure as followse) Edit existing remote n) New remote d) Delete remote r) Rename remote c) Copy remote s) Set configuration password q) Quit config e/n/d/r/c/s/q> n name>onedrive Type of storage to configure. Enter a string value. Press Enter for the default (""). Choose a number from below, or type in your own value 1 / 1Fichier \ "fichier" 2 / Alias for an existing remote \ "alias" 3 / Amazon Drive \ "amazon cloud drive" 4 / Amazon S3 Compliant Storage Provider (AWS, Alibaba, Ceph, Digital Ocean, Dreamhost, IBM COS, Minio, etc) \ "s3" 5 / Backblaze B2 \ "b2" 6 / Box \ "box" 7 / Cache a remote \ "cache" 8 / Citrix Sharefile \ "sharefile" 9 / Dropbox \ "dropbox" 10 / Encrypt/Decrypt a remote \ "crypt" 11 / FTP Connection \ "ftp" 12 / Google Cloud Storage (this is not Google Drive) \ "google cloud storage" 13 / Google Drive \ "drive" 14 / Google Photos \ "google photos" 15 / Hubic \ "hubic" 16 / JottaCloud \ "jottacloud" 17 / Koofr \ "koofr" 18 / Local Disk \ "local" 19 / Mail.ru Cloud \ "mailru" 20 / Mega \ "mega" 21 / Microsoft Azure Blob Storage \ "azureblob" 22 / Microsoft OneDrive \ "onedrive" 23 / OpenDrive \ "opendrive" 24 / Openstack Swift (Rackspace Cloud Files, Memset Memstore, OVH) \ "swift" 25 / Pcloud \ "pcloud" 26 / Put.io \ "putio" 27 / QingCloud Object Storage \ "qingstor" 28 / SSH/SFTP Connection \ "sftp" 29 / Transparently chunk/split large files \ "chunker" 30 / Union merges the contents of several remotes \ "union" 31 / Webdav \ "webdav" 32 / Yandex Disk \ "yandex" 33 / http Connection \ "http" 34 / premiumize.me \ "premiumizeme" Storage>22 ** See help for onedrive backend at: https://rclone.org/onedrive/ ** Microsoft App Client Id Leave blank normally. Enter a string value. Press Enter for the default (""). client_id>Enter the "Application (client) ID" from above Microsoft App Client Secret Leave blank normally. Enter a string value. Press Enter for the default (""). client_secret>Enter the "Value" obtained above OneDrive operated by 21Vianet (Century Internet). Enter a boolean value (true or false). Press Enter for the default ("false"). is_21vianet_version>true Edit advanced config? (y/n) y) Yes n) No y/n>n Use auto config? * Say Y if not sure * Say N if you are working on a remote or headless machine y) Yes n) No y/n>y A webpage will automatically open for login, then continue... Choose a number from below, or type in an existing value 1 / OneDrive Personal or Business \ "onedrive" 2 / Root Sharepoint site \ "sharepoint" 3 / Type in driveID \ "driveid" 4 / Type in SiteID \ "siteid" 5 / Search a Sharepoint site \ "search" Your choice> 1 Found 1 drives, please select the one you want to use: 0: OneDrive (business) id=****** Chose drive to use:>0 Found drive 'root' of type 'business', URL: https://alphaone-my.sharepoint.cn/personal/*** Is that okay? y) Yes n) No y/n>y y q
-
-
Mounting
linuxneeds to installfuse, which varies by distribution, so I won't elaborate. Mymanjarocomes with it.The command is as follows: (where / represents the path to mount
onedrivelocally, and/mnt/represents the local mount path, which can be modified accordingly)Mount command: rclone mount onedrive:/ /mnt/ --copy-links --no-gzip-encoding --no-check-certificate --allow-other --allow-non-empty --umask 000 Background mount command: nohup rclone mount onedrive:/ /mnt --copy-links --no-gzip-encoding --no-check-certificate --allow-other --allow-non-empty --umask 000 >/dev/null 2>&1 & Unmount command: fusermount -qzu LocalFolder onedrive -
Using the mount script
This mount script can achieve basic mounting, unmounting, and remounting functions, so you won't need to enter such long commands afterward. The script is as follows:
#!/bin/bash
# ------------------------------------------
PATH=/bin:/sbin:/usr/bin:/usr/sbin:/usr/local/bin:/usr/local/sbin:~/bin
export PATH

### BEGIN INIT INFO
# Provides:          rclone
# Required-Start:    $all
# Required-Stop:     $all
# Default-Start:     2 3 4 5
# Default-Stop:      0 1 6
# Short-Description: Start rclone at boot time
# Description:       Enable rclone by daemon.
### END INIT INFO
# ------------------------------------------
# The content between the two lines above can be removed if you don't want it to start automatically (I personally think it won't affect if removed).

NAME_BIN="rclone"
NAME="onedrive"
REMOTE='/' # The path to mount to the local onedrive, can be modified
LOCAL='/mnt/' # Which local folder to mount to, can be modified

Green_font_prefix="\033[32m" && Red_font_prefix="\033[31m" && Green_background_prefix="\033[42;37m" && Red_background_prefix="\033[41;37m" && Font_color_suffix="\033[0m"
Info="${Green_font_prefix}[Info]${Font_color_suffix}"
Error="${Red_font_prefix}[Error]${Font_color_suffix}"
RETVAL=0

check_running(){
    PID="$(ps -C $NAME_BIN -o pid= |head -n1 |grep -o '[0-9]\{1,\}')"
    if [[ ! -z ${PID} ]]; then
        return 0
    else
        return 1
    fi
}
do_start(){
    check_running
    if [[ $? -eq 0 ]]; then
        echo -e "${Info} $NAME_BIN (PID ${PID}) is running..." && exit 0
    else
        fusermount -zuq $LOCAL >/dev/null 2>&1
        mkdir -p $LOCAL
        /usr/bin/rclone mount $NAME:$REMOTE $LOCAL --copy-links --no-gzip-encoding --no-check-certificate --allow-other --allow-non-empty --umask 000 >/dev/null 2>&1 &
        check_running
        if [[ $? -eq 0 ]]; then
            echo -e "${Info} $NAME_BIN started successfully!"
        else
            echo -e "${Error} $NAME_BIN failed to start!"
        fi
    fi
}
do_stop(){
    check_running
    if [[ $? -eq 0 ]]; then
        kill -9 ${PID}
        RETVAL=$?
        if [[ $RETVAL -eq 0 ]]; then
            echo -e "${Info} $NAME_BIN stopped successfully!"
        else
            echo -e "${Error} $NAME_BIN failed to stop!"
        fi
    else
        echo -e "${Info} $NAME_BIN is not running"
        RETVAL=1
    fi
    fusermount -zuq $LOCAL >/dev/null 2>&1
    fusermount -zuq $LOCAL1 >/dev/null 2>&1
}
do_status(){
    check_running
    if [[ $? -eq 0 ]]; then
        echo -e "${Info} $NAME_BIN (PID $(echo ${PID})) is running..."
    else
        echo -e "${Info} $NAME_BIN is not running!"
        RETVAL=1
    fi
}
do_restart(){
    do_stop
    do_start
}
case "$1" in
    start|stop|restart|status)
    do_$1
    ;;
    *)
    echo "Usage: $0 { start | stop | restart | status }"
    RETVAL=1
    ;;
esac
exit $RETVAL
Assuming this script is saved as
rcloned, first give it executable permissions:chmod +x path_to_rclonedYou can then choose to move it to the environment variable, manually execute
rcloned startwhen using:sudo mv path_to_rcloned /usr/bin/rcloned # Each time you use it rcloned startYou can also choose to set it to run automatically at boot like the original text (may not be supported by all distributions):
sudo mv path_to_rcloned /etc/init.d/rcloned
sudo /etc/init.d/rcloned start
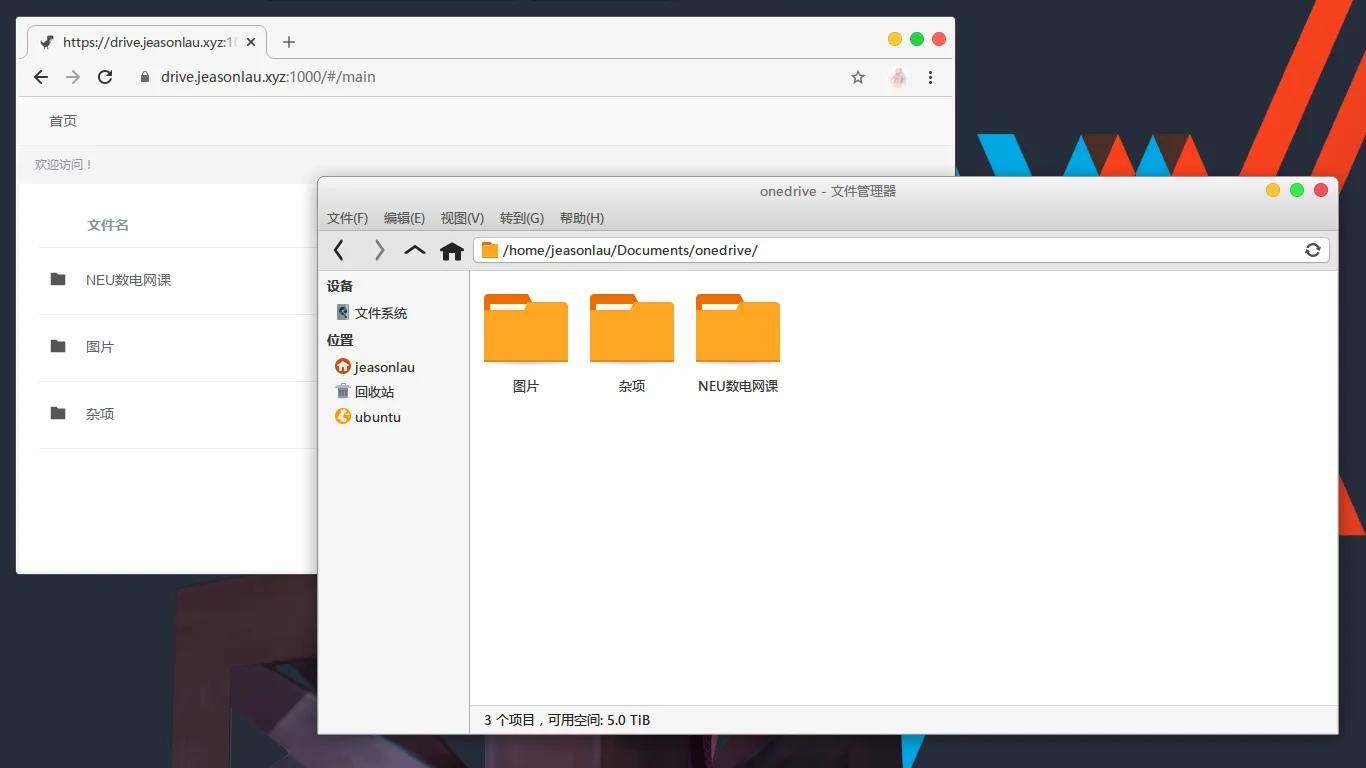
Screenshot#
Thoughts#
I originally planned to write a short article, but unexpectedly ended up writing so much...
Some steps in between are overly detailed, I hope you don't find me verbose while reading orz
References#
-
Zephyr Grocery Store (where I purchased the account)